What is LED Strip Voltage Drop And How to Avoid it
When installing LED Strip light, one of the important things to consider is the effect of Voltage Drop. In low DC circuits, voltage gradually drops as it travels along through a length of wire, because of the resistance. The longer length, more voltage drop, that is why the most led strip is not suggested to connect over 5M. The voltage drop issue will lead to having one end of your strip lights brighter than the other ends.
What factors affect voltage drop?
The width and thickness of copper on PCB.
Now we know the main factor is the resistance of the wire. As led strip light, the Flexible PCB saw as a wire. the width and thickness of copper foil on PCB will affect the resistance. The resistance of the material is proportional to the length of the material, that is, when the material and cross-sectional area are constant, the longer the length, the greater the resistance of the material; and it is inversely proportional to the cross-sectional area of the material, that is, when the material and length are constant, the cross-sectional area is constant. The larger the cross-sectional area, the smaller the resistance.
Thus, the thicker and wider copper foil will make resistance smaller. It will reduce voltage drop in application. That is why TILLUME LED Strip selects 35mil copper as PCB. Meanwhile, in our LED strip, there have 2 circuits designed, one is 35mil copper for LEDs, and the other is also 35mil for power supply circuits. It can minimize the internal resistance to reduce voltage drop. You can read more from What makes high quality LED Strip.
Another factor is temperature.
In general, the resistivity of a material increases with increasing temperature. If LEDs drive by a higher current, it will create more heat to up the temperature of PCB, and temperature increasing the resistance will go up together. In the final, we will find a voltage drop increase after the LED strip works for a while.
In order to reduce this heat factor, we have to ask LEDs to drive by a small current as possible. That means we have better choose LED strip which has more LEDs in one meter, and more segments on a reel (5m). Because more segments mean more LEDs are connected in parallel for the same power, the current for LEDs can be small on the same wattage.
How to avoid Voltage Drop when fixing LED strip
Besides choosing a high-quality LED strip, you can do a few things to avoid voltage drop in some situations. In fact, a 24V LED strip light has a better performance than a 12V LED Strip. so if you are looking it make longer runs, we would recommend going with 24V LED strips.
Divide long runs of LED strip lights into shorter strips, then connect additional “Parallel” wires from the power supply to each new LED strip. This process can be repeated as many times as needed. You may also run additional wire from the power unit alongside the uncut LED strip and attach it when voltage drop starts to occur. Just make sure you are using the correct wire gauge as explained below.
The way of determining the Correct Wire Gauge:
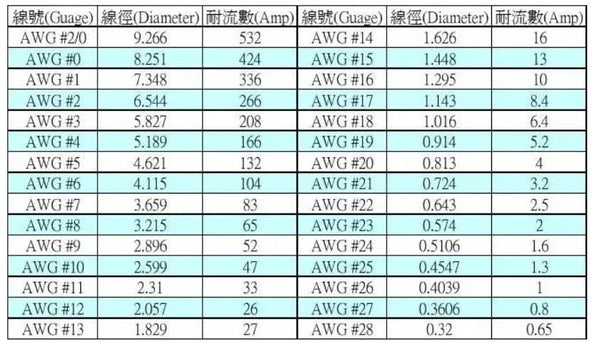
Note: The wire itself draws current. If you are running longer lengths of wire than the total length of strips, use the next thickest wire. On the AWG scale, a LOWER number indicates a THICKER wire
It’s never a good idea to continuously run any electronic circuit at maximum capacity. For best results, add an additional 20% margin to your calculations. For example, if your total power consumption is 100 watts, add 20% (watts x 1.2) and assume it’s 120 watts. Then continue to perform your calculations for power supplies and wire gauges. This will protect your system to make it last longer and operate more safely.